How to Use MySQL Workbench for Database Management
It is a powerful, visual database design and management tool that provides comprehensive features for database architects, developers, and DBAs. This guide will walk you through the essential features and functionalities of MySQL Workbench, enabling you to effectively manage your databases.
1. Installation and Setup
Download and Install MySQL Workbench:
- Go to the Workbench download page and choose the appropriate version for your operating system.
- Follow the installation instructions for your OS (Windows, macOS, Linux).
Set Up a Connection:
- Open MySQL Workbench.
- Click on the
+symbol next to MySQL Connections to set up a new connection. - Enter the connection name, host name, port, and your MySQL username and password.
- Click Test Connection to ensure the connection works, then click OK.
2. Navigating the Interface
Main Dashboard:
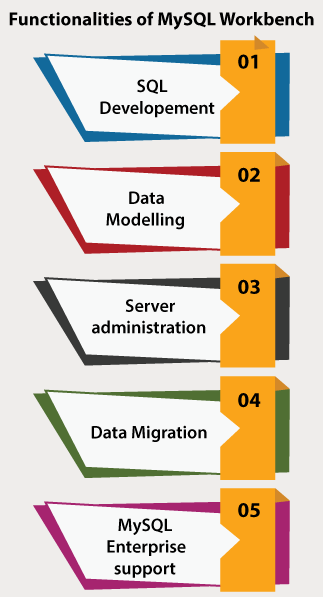
- The main dashboard includes panels for MySQL Connections, Server Administration, Data Modeling, and SQL Development.
SQL Editor:
- The SQL Editor is where you can write and execute SQL queries. It also provides options for managing scripts and viewing query results.
Schema Browser:
- On the left, you’ll find the Schema Browser, which displays all the databases (schemas) on the connected server.
- Expand a schema to view its tables, views, stored procedures, and functions.
3. Creating and Managing Databases
Create a New Database:
- Click on the Schemas tab in the Schema Browser.
- Right-click in the white space and select Create Schema.
- Enter a name for your new database and click Apply.
Create Tables:
- Select your database in the Schema Browser.
- Right-click the Tables node and choose Create Table.
- In the table editor, define columns, data types, primary keys, and other constraints.
- Click Apply to create the table.
Manage Tables:
- Right-click an existing table to view options like Alter Table, Drop Table, or Select Rows – Limit 1000 to quickly view the table’s contents.
4. Writing and Executing SQL Queries
Open SQL Editor:
- Click on the SQL tab or double-click a connection to open the SQL Editor.
- Write your SQL query in the editor window.
Execute Queries:
- Click the lightning bolt icon to execute the query.
- The results will be displayed in the Result Grid below the editor.
- Use the Output pane to view messages, warnings, or errors related to your query execution.
Save and Load Scripts:
- Save your SQL scripts by clicking File > Save Script As.
- Load existing scripts using File > Open SQL Script.
5. Data Modeling and Database Design
Create an EER Diagram:
- Click on the Model tab and select Create EER Model from Database.
- Select the schema you want to model and click Next.
- An EER (Enhanced Entity-Relationship) diagram will be generated, showing the tables and relationships.
Modify the EER Diagram:
- Drag and drop tables to arrange them.
- Use the tools in the toolbar to add new tables, foreign keys, and relationships.
- Double-click on elements to modify their properties.
Synchronize Model and Database:
- To synchronize your model with the database, click Database > Synchronize Model.
- Follow the wizard to update the database schema based on your model changes.
6. Backup and Restore
Backup Databases:
- Go to Server > Data Export.
- Select the database(s) you want to export.
- Choose the export options and click Start Export.
Restore Databases:
- Go to Server > Data Import.
- Select the database and import options.
- Click Start Import to restore the database from a backup file.
7. Server Administration
Manage Users and Privileges:
- Click on Server > Users and Privileges.
- Add new users, edit existing users, and assign privileges.
Monitor Server Performance:
- Use Server > Performance Dashboard to monitor server status, queries, and connections.
- Identify and optimize slow queries using the Performance Reports.
8. Tips and Best Practices
Regular Backups:
- Regularly back up your databases to prevent data loss.
Keep Workbench Updated:
- Ensure you’re using the latest version of MySQL Workbench for security and feature updates.
Use Comments:
- Comment your SQL scripts to make them easier to understand and maintain.
Secure Your Connections:
- Use SSL/TLS for secure connections between MySQL Workbench and the database server.

MySQL Workbench 

Conclusion
It is a versatile tool that simplifies database management tasks, from designing schemas and writing queries to managing users and monitoring performance. By mastering its features, you can efficiently manage your MySQL databases and ensure their smooth operation.